Help
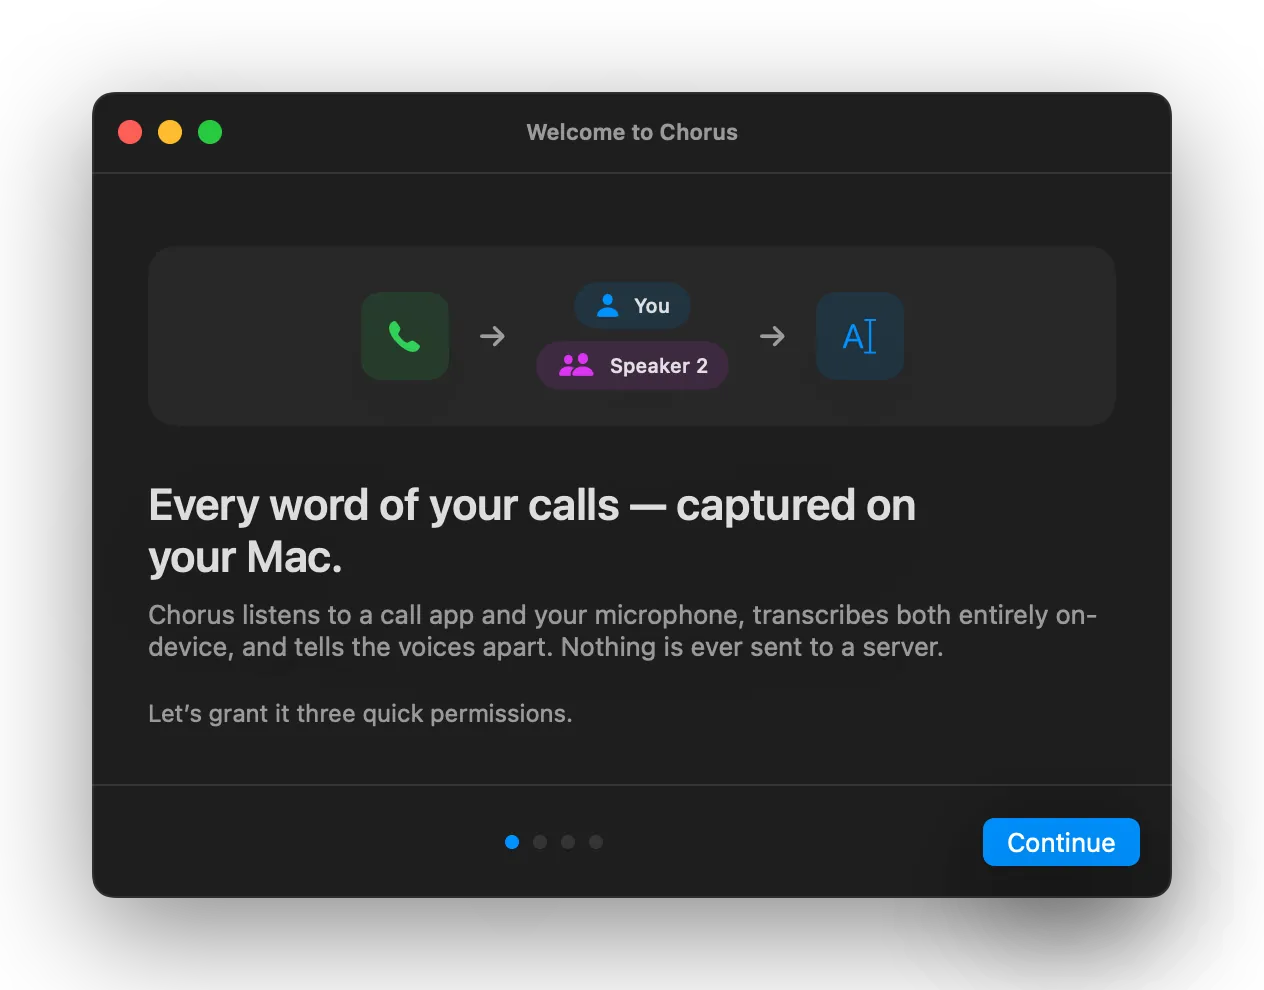
Chorus listens to a call app on your Mac, writes down both sides as they speak, splits the conversation into per-speaker turns, and — if you like — types the running transcript straight into whatever text field you have focused. Every word is transcribed on your Mac; nothing is sent anywhere.
This is the complete guide. Quick start and Permissions are enough for most people; the rest is here when you want it.
On this page
- Quick start
- A few terms worth knowing
- How Chorus works
- Installing Chorus
- Permissions
- The recording indicator
- Picking the source app
- Including your microphone
- Speaker labels
- Typing into the focused field
- Reading and managing transcripts
- Saving and exporting
- Settings reference
- Keyboard shortcuts
- Updating Chorus
- Privacy
- Troubleshooting
- Frequently asked questions
Quick start
Chorus lives in your menu bar — look for the waveform icon near the clock. Click it to open Chorus.
- Start your call in whatever app you use (Zoom, FaceTime, Meet, Slack, a phone call mirrored to your Mac — anything that plays the other person’s voice through your Mac).
- Open Chorus and pick that app from the source list.
- Press Start Listening. The transcript appears live in the Chorus window, and — if typing is switched on — in whatever text field you have focused.
- Press Stop when you’re done. The session is saved automatically.

The one rule that trips people up: the app you’re transcribing must be actively playing audio at the moment you press Start. Chorus attaches to a live sound stream — if the app is silent, or the call hasn’t started yet, there’s nothing to attach to. Start the call first, then press Start. (More on this below.)
A few terms worth knowing
A handful of words show up throughout this guide and in the app. None of them are complicated:
- Source app — the app whose audio you’re transcribing. The “other side” of your call comes out of this app’s speakers, so that’s what Chorus listens to.
- The far end — everyone who isn’t you: the people on the other side of the call. Their audio comes from the source app.
- The near end — you. Your voice, captured from your microphone. Including the near end is optional.
- Diarization (speaker separation) — the on-device step that figures out who is speaking on the far end and labels each turn “Speaker 1”, “Speaker 2”, and so on.
- Injection (typing) — Chorus typing the finalized transcript into the text field you have focused, exactly as if you’d typed it yourself.
- On-device — done entirely on your Mac, with no server involved. All of Chorus’s transcription works this way.
How Chorus works
When you press Start, Chorus does four things, in order, and keeps doing them until you stop:
- It taps the source app’s audio. macOS lets an app listen in on another app’s sound stream (a Core Audio tap). Chorus uses it to hear the far end without touching your speakers, microphone, or anything you can see on screen.
- It (optionally) listens to your microphone, so your side of the conversation is in the transcript too.
- It transcribes both streams live, using Apple’s built-in on-device speech engine (SpeechAnalyzer). Words appear within a second or so of being spoken.
- It separates the far-end speakers with a small on-device model, so a two- or three-person call reads as a real back-and-forth instead of one undifferentiated block of text.
Everything happens on your Mac, in real time. There’s no upload step, no “processing in the cloud,” and no waiting for a server. After the one-time model download on first launch, Chorus even works with Wi-Fi off.
A useful way to picture it: Chorus is a quiet stenographer sitting next to your speakers and your microphone. It can only write down what it can currently hear — which is exactly why the source app needs to be making sound when you start.
Installing Chorus
Chorus is distributed as a .dmg from this site (it isn’t on the Mac App Store, because tapping
audio and typing into other apps aren’t allowed there).
- Download the latest version and open the
.dmg. - Drag Chorus onto the Applications folder in the window that appears.
- Open Chorus from Applications. The first time, macOS shows a “Chorus was downloaded from the Internet — are you sure you want to open it?” prompt. This is normal for any app that isn’t from the App Store. Click Open. (Chorus is signed and notarized by Apple, so you’ll only see this once.)
Run Chorus from your Applications folder. macOS ties the permissions you grant to the app’s exact location. If you run it from Downloads or the disk image, the permissions can come undone when you move it later. Install it once in Applications and grants stick.
On first launch, a short setup window walks you through the three permissions and quietly downloads the speech and speaker-separation models in the background so they’re ready for your first call.
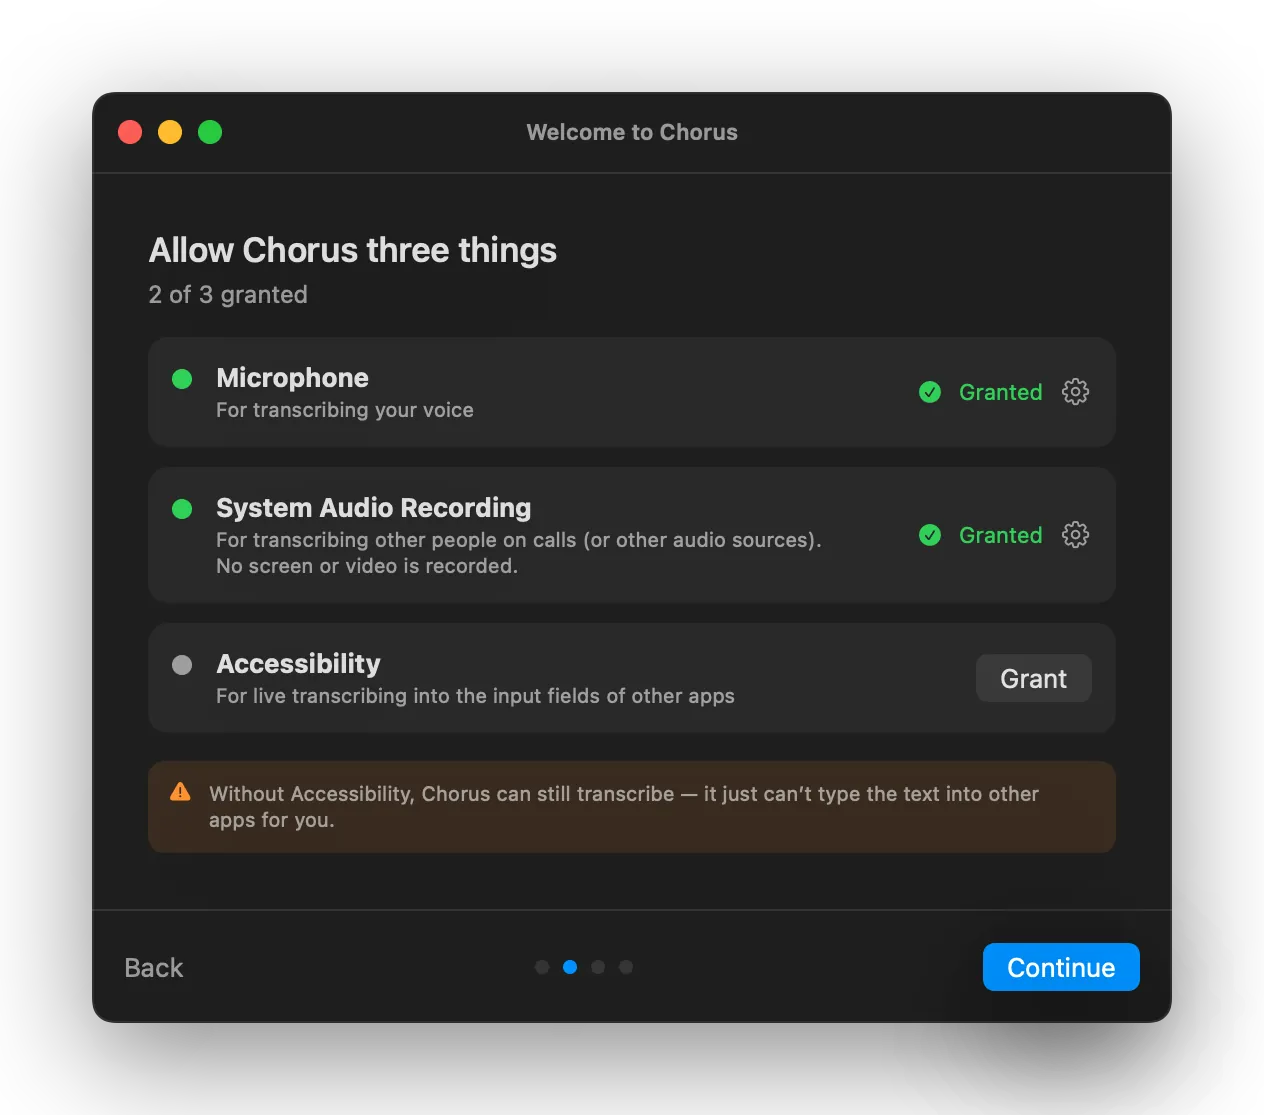
Permissions
Chorus needs up to three macOS permissions. It re-checks them every time it runs — if something isn’t working, the app tells you which one to fix.
| Permission | What it lets Chorus do | Required? |
|---|---|---|
| Microphone | Include your voice (the near end) in the transcript. | Required to finish setup — but you can set the mic to Off for any call to keep your side out of the transcript. |
| System Audio Recording | Capture the source app’s audio (the far end). This is the audio-only grant — it gives Chorus no access to your screen. | Required — without it, Chorus hears only silence. |
| Accessibility | Type the transcript into the focused text field. | Optional — without it, Chorus still transcribes; it just can’t type for you. |
To grant a permission: open System Settings → Privacy & Security, find the matching section, and switch Chorus on. No hunting required — every permission row in Chorus has a button that opens the exact pane.
A couple of macOS quirks worth knowing:
- Some grants need a relaunch. A grant occasionally only takes effect after Chorus restarts. The setup window and Settings → Permissions both have a Relaunch Chorus button for exactly this.
- The audio grant lives in a scary-sounding pane. In System Settings it sits under Screen & System Audio Recording, but Chorus appears in the System Audio Recording Only list — the audio-only grant. It cannot see your screen, full stop. See the recording indicator.
The recording indicator
While Chorus is listening, macOS shows its recording indicator (an orange or purple dot near the menu bar, and an entry in Control Center). That’s expected: macOS flags every app that captures system audio, however it does it.
Chorus records audio only — never your screen, your windows, or video. It holds the audio-only grant and has no screen access at all. The indicator is macOS being cautious on your behalf, not a sign that anything is being watched or sent anywhere.
Picking the source app
In the Chorus popover, the source list shows the apps currently running on your Mac that are able to produce audio. Pick the one your call is in.
A few things that help:
- Make sound first. The list and the tap both work off live audio, so the app needs to be playing something when you choose it and when you press Start. If your call app isn’t in the list, join the call (or play any audio in it) and the list will catch up.
- One entry per app. Some call apps (Zoom is the classic example) split their audio across several helper processes. Chorus collapses these into a single, sensible entry — you don’t need to know which helper is making the sound.
- It doesn’t have to be a “call” app. A podcast, a YouTube video, a voice memo playing in QuickTime — if a Mac app is making sound, Chorus can transcribe it.
Including your microphone
Pick a microphone in the popover and Chorus adds your side of the conversation to the transcript, labelled “You” (or the name you set in Settings → Transcripts). Set the mic to Off and Chorus transcribes only the far end — useful when you’re taking notes on a talk, a video, or a call where your own words don’t need to be on the record.
Your microphone audio is treated exactly like everything else in Chorus: transcribed on-device, never recorded to a server, never uploaded.
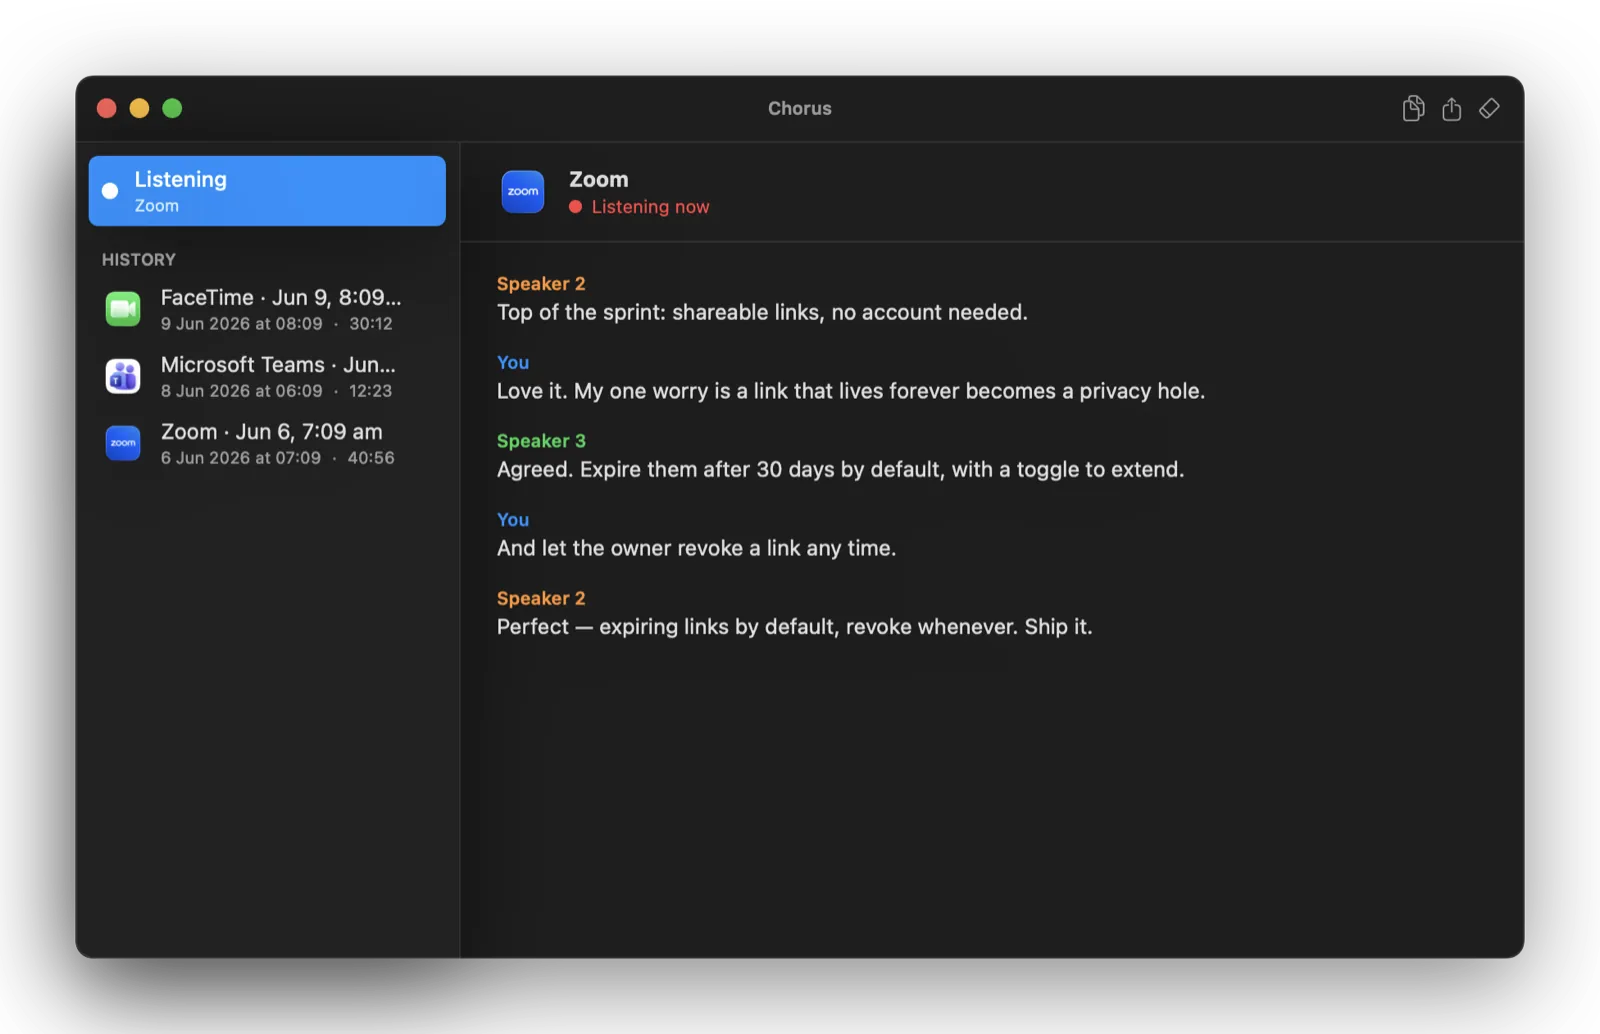
Speaker labels
Chorus labels each turn so the transcript reads like a conversation:
- “You” — your microphone (the near end). You can swap in your real name in Settings → Transcripts.
- “Speaker 1”, “Speaker 2”, … — the people on the far end, separated by Chorus’s on-device diarization.
Because the far end arrives as a single mixed audio stream, Chorus identifies speakers from the sound of their voices rather than from any account or name. That’s remarkably good, but it’s a best-effort guess: occasionally two similar voices merge into one label, or one person’s turns split across two. You can rename or tidy speakers when you export.
Two things that surprise people:
- Everyone shows as “Speaker 1”. This means the speaker-separation model isn’t available — almost always because the Mac was offline the first time Chorus ran and couldn’t download it. See Troubleshooting.
- Speaker numbers changed mid-session. If your Mac switches audio devices partway through a call (you plug in headphones, say), Chorus rebuilds its audio chain and the far-end speaker numbering can restart. Your transcript and session are kept intact — only the numbers may shift. It’s rare, and expected.
Typing into the focused field
This is Chorus’s party trick. Switch on Stream transcript to focused app (the Type into focused field toggle in the popover above), and as each line is finalized Chorus types it into whatever text field currently has keyboard focus — your notes app, a document, a chat box, a CRM field — exactly as if you were typing it by hand.
It’s deliberately careful about it:
- It never types into Chorus’s own windows. Click into your document, not into Chorus.
- It only types into a real text field. If nothing suitable is focused, macOS beeps once per character — that’s your cue to click into an actual text input first.
- You can pause it instantly. Flip the toggle off and typing stops on the spot, while transcription keeps running in the background. Flip it back on to resume.
A note on Electron apps. Some apps built on web technology (many chat and notes apps are Electron under the hood — a website in a trench coat) accept synthesized keystrokes less reliably. If typing misbehaves in one of those, just read the transcript in the Chorus window and copy it across — or export it when you’re done.
Reading and managing transcripts
There are two places to read what Chorus captured:
- The popover shows a live, scrolling view of the current session, with quick Copy and Clear buttons. Clear only wipes the live view — your saved sessions are untouched.
- The transcript window (click History, or press ⌘0 in Dock mode) is the full picture: a History list of every saved session on the left, and the selected session on the right, where you can copy, export, rename, or delete it.
Only finalized text is ever saved. As Chorus listens, the last few words are “volatile” — still being refined as more audio arrives. Those in-progress words are never written to disk; only the settled text is, so your saved transcripts don’t contain half-heard guesses.
Saving and exporting
Every session autosaves to your Mac as you go. Each session
is one file in your Application Support folder (~/Library/Application Support/Chorus/Transcripts/).
From the transcript window you can export any session to:
| Format | Extension | Good for |
|---|---|---|
| Plain text | .txt | Pasting into notes, email, or a doc. Speaker turns are prefixed with the speaker name. |
| Markdown | .md | Notes apps and docs that render Markdown, with speakers as bold headings. |
| SubRip subtitles | .srt | Captions for video editors and players. |
| WebVTT subtitles | .vtt | Web video captions. |
Subtitle timestamps come from when Chorus heard each line — approximate, but the files load anywhere subtitles are accepted.
You decide how long sessions are kept (Settings → Transcripts), from “Forever” down to 7 days, and you can delete everything at once. Chorus never deletes a session that’s still in progress.
Settings reference
Open Settings from the popover (the gear), or from the Chorus menu in Dock mode.
General
- Launch Chorus at login — start Chorus automatically and have it waiting in the menu bar.
- Show Chorus in the Dock — by default Chorus is a quiet menu-bar app with no Dock icon. Turn this on for a Dock icon and a normal menu bar (with the ⌘ shortcuts).
- Check for updates automatically — Chorus looks for new versions in the background and lets you know when one is ready.
- Start/stop listening shortcut — record any key combo to toggle listening from anywhere, even when Chorus isn’t focused. Leave it blank to turn the shortcut off.
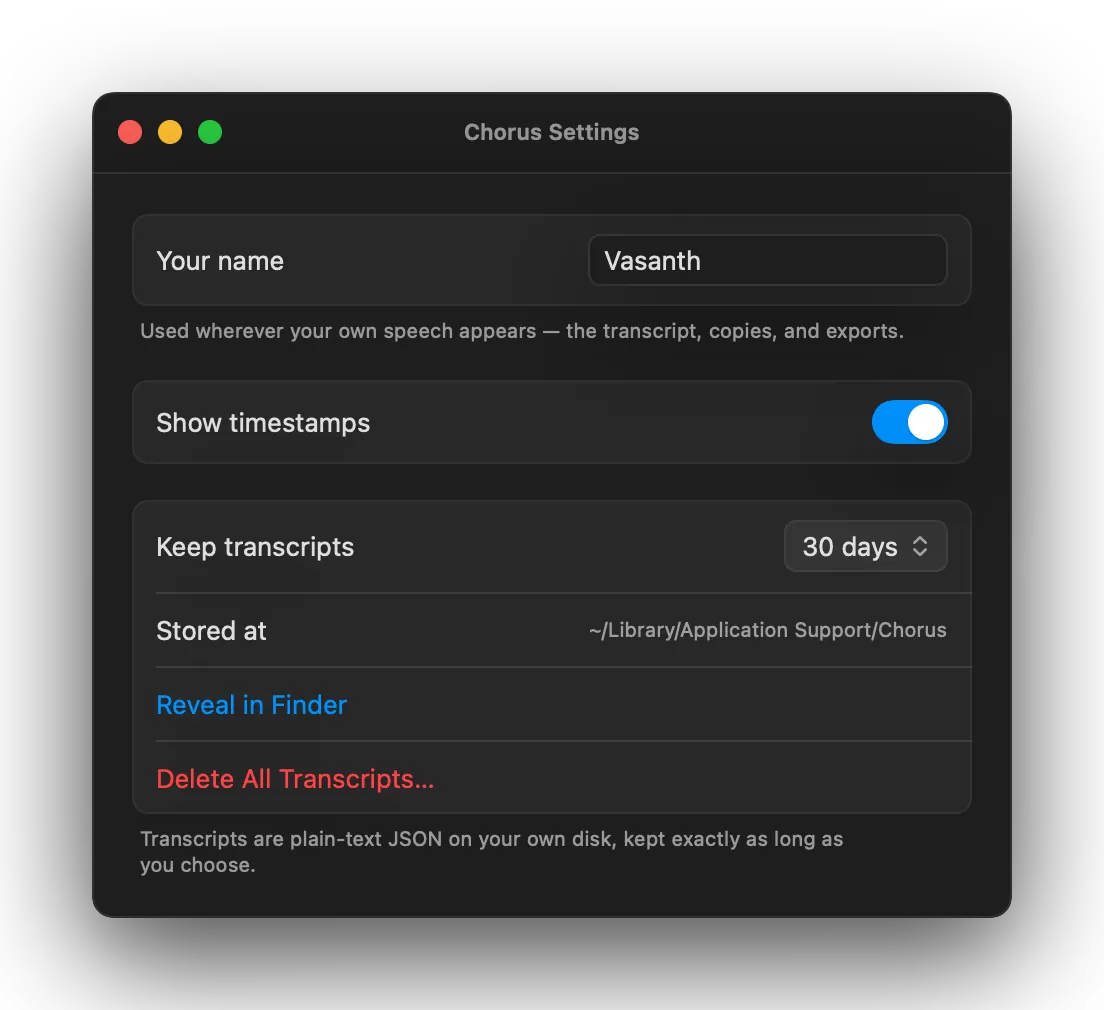
Transcripts
- Your name — labels your own speech in the transcript, copies, exports, and typed-out text. Leave it blank to stay “You”.
- Show timestamps in transcript — prefix each turn with when it was said.
- Keep transcripts for — Forever, 90, 30, or 7 days. Shortening the window deletes anything already older than it, so Chorus asks you to confirm first.
- Stored at / Reveal in Finder — shows and opens the folder your transcripts live in.
- Delete All Transcripts — removes every saved session. This can’t be undone.
Permissions — a live status summary of the three grants and a button back into the setup walkthrough.
License — your trial status, and where you paste your licence key after buying.
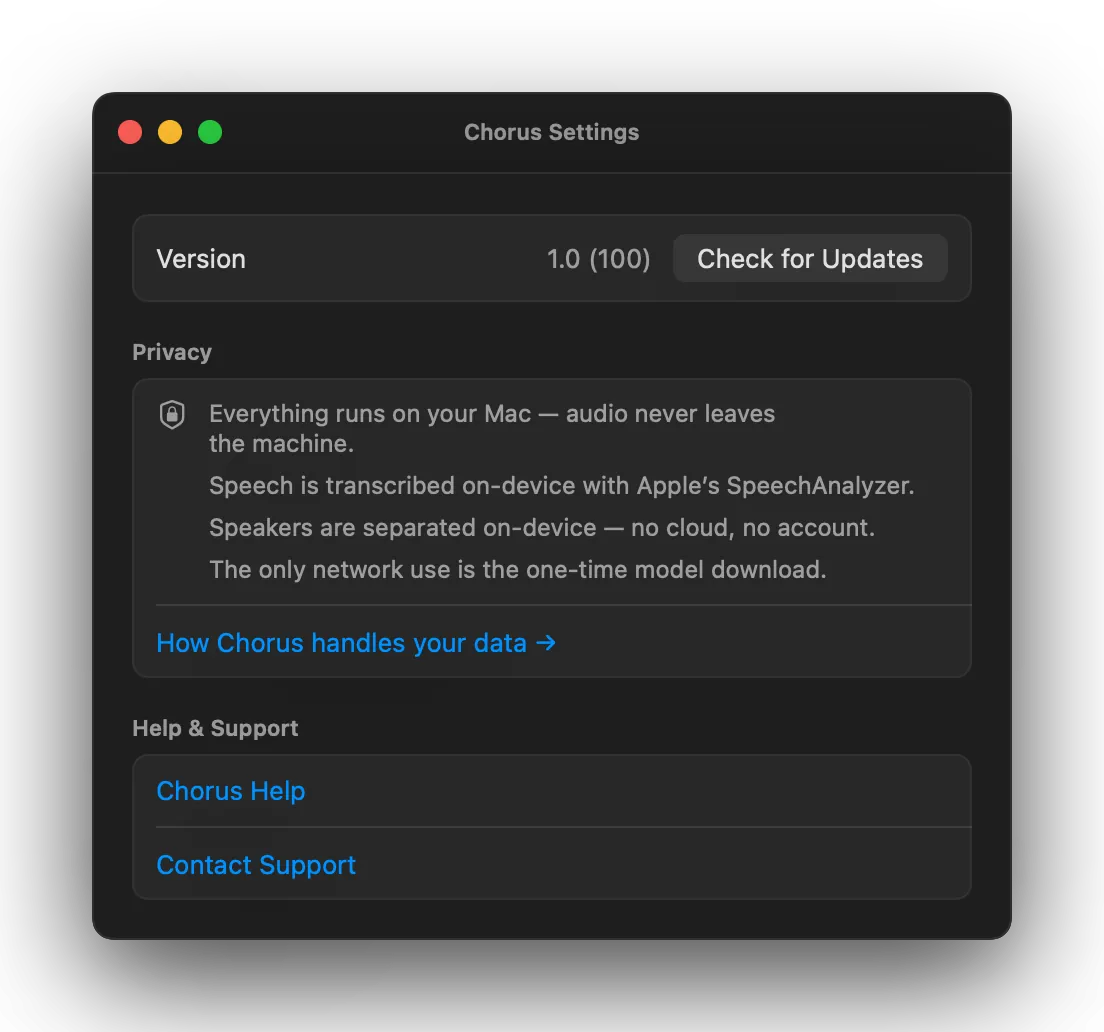
About — version and Check for Updates…, a plain-English privacy summary, Contact Support (a pre-addressed email with your Chorus and macOS versions filled in, so I can help faster), Acknowledgments (the open-source components Chorus is built on), and links to this guide, the Privacy Policy, and the Terms.
Keyboard shortcuts
| Shortcut | Action |
|---|---|
| Your shortcut | Start / stop listening from anywhere — record whatever combo you like in Settings → General. |
| ⌘0 | Open the transcript window (in Dock mode). |
| ⌘? | Open this Help guide (in Dock mode). |
The ⌘ menu shortcuts appear when Chorus is in Dock mode — a menu-bar-only app has no menu bar to hang them on. The global start/stop shortcut works in either mode.
Updating Chorus
Chorus checks for updates on its own and lets you know when one is ready. You can also check any time from Settings → About → Check for Updates… (or the Chorus menu in Dock mode).
Updates are signed and verified before they’re installed, so an update can only come from me. The Changelog lists what’s new in every release.
Privacy
Chorus is built so your conversations never leave your Mac:
- Audio and transcripts are processed and stored entirely on-device. There is no server that ever sees them.
- The only network activity is downloading the speech models on first run, checking for updates, and validating your licence — never your audio, never your transcripts.
- No analytics. No telemetry. No crash reports. No account.
That’s the whole story; the full Privacy Policy spells out each point.
Recording consent is your call. Laws on recording and transcribing conversations vary by place, and some require everyone’s consent. Chorus gives you the tool; making sure the people on your call are comfortable being transcribed is up to you.
Troubleshooting
| Symptom | What’s happening, and the fix |
|---|---|
| No transcript / total silence | Either “System Audio Recording” isn’t granted, or the source app wasn’t playing audio when you pressed Start. Grant the permission (System Settings → Privacy & Security), make sure the call is live, and press Start again. |
| My voice is missing | The microphone is set to Off in the popover, or the Microphone permission isn’t granted. Pick a mic (and grant the permission) if you want your side in the transcript. |
| Nothing types into my document | Accessibility isn’t granted, or the focused element isn’t a text field. Grant Accessibility and click into a real text input first. If macOS beeps per character, the focused spot isn’t a text field. |
| Typing is unreliable in one app | Some Electron (web-based) apps accept synthesized keystrokes poorly. Read from the Chorus window and copy/paste, or export when you’re done. |
| Everyone is labelled “Speaker 1” | The speaker-separation model didn’t finish downloading — usually because the Mac was offline on first run. Connect to the internet, then start a new session so Chorus can fetch it. The setup window also shows the model’s status and a Retry button. |
| My language isn’t transcribed | On-device transcription follows your Mac’s system language. Set your Mac to a language Apple’s speech engine supports. |
| Audio cut out when I changed devices | Expected. Switching the default audio device (plugging in headphones, say) restarts capture. Your transcript and session are preserved and it recovers on its own within a moment. |
| The source app isn’t in the list | It isn’t making sound yet. Start the call or play audio in it, then reopen the Chorus picker. |
| Gatekeeper warned me on first launch | Normal for a notarized app downloaded from the web — click Open. For permissions that stick, run Chorus from your Applications folder. |
Still stuck? Email chorus@onepointtwoone.com. Chorus’s built-in Contact Support button (Settings → About) writes to the same inbox and includes your version details automatically.
Frequently asked questions
Does my audio or transcript ever leave my Mac? No. All transcription happens on-device. The only times Chorus touches the network are the one-time model download, update checks, and licence validation — none of which send your audio or transcripts. See Privacy.
Does Chorus record my screen? No. Chorus captures audio only — it holds the audio-only grant and has no screen access. macOS shows its recording indicator for any system-audio capture, but Chorus never sees your screen. See the recording indicator.
Why does the app I want to transcribe need to be playing audio? Chorus attaches to a live audio stream. If the app is silent, there’s no stream to attach to — so start the call (or play something) before you press Start. See Picking the source app.
Can I transcribe just the other person, not myself? Yes. Set the microphone to Off in the popover and Chorus transcribes only the far end.
Can I transcribe a regular phone call? If the call’s audio is playing through your Mac — for example via Continuity on an iPhone call, or a softphone app — yes. Chorus transcribes whatever a Mac app is playing.
Does Chorus work offline? Transcription itself runs entirely on your Mac — no internet connection is needed once the on-device models have downloaded on first run. That said, Chorus is built to transcribe calls, and if you’ve figured out how to take a Zoom call offline, you’ve solved a bigger problem than transcription. The point isn’t offline operation; it’s that your audio never leaves your Mac regardless of whether the Mac is online.
What languages does it support? English is the only officially supported language right now. Chorus uses Apple’s on-device speech engine, which follows your Mac’s system language — so other languages may work to varying degrees, but English is where Chorus has been built and tested. More language support is something to explore down the road.
Where are my transcripts stored, and are they encrypted?
In ~/Library/Application Support/Chorus/Transcripts/, as one file per session. They’re protected
by your Mac’s own encryption (FileVault) and owner-only folder permissions; Chorus doesn’t add a
separate password layer. Use Settings → Transcripts to set retention or delete them.
Can I edit or rename speakers? You can rename and delete whole sessions in the transcript window, and set your own label (instead of “You”) in Settings → Transcripts. Far-end labels come from on-device diarization; tidy those up in your exported text if a name needs fixing.
How much does Chorus cost? $10, one time. No subscription, no account. See Buy.
How do updates work? Chorus checks for signed updates automatically and installs them with your go-ahead. Check manually in Settings → About. See Updating Chorus.
What do I need to run it? An Apple-Silicon Mac running macOS 26 (Tahoe) or later.
I could vibe code this myself! Great, go for it! Fair warning though: it’ll almost certainly cost more than $10 in AI credits to get there, and then the code will be entirely your problem to maintain. Chorus already exists, works, and costs ten bucks. But if you’d genuinely rather spend a weekend debugging Core Audio HAL taps and on-device diarization pipelines, no one is stopping you. I’m rooting for you.
I have a question that isn’t here. Email chorus@onepointtwoone.com — there’s a real person behind the inbox.